- 浏览: 196621 次
- 性别:

- 来自: 芜湖
-

文章分类
- 全部博客 (139)
- 软件 (0)
- Pattern (6)
- CSDN导入 (19)
- Struts (3)
- [网站分类]1.网站首页原创 (27)
- [网站分类]6.转载区 (4)
- Hibernate (10)
- Error (8)
- [网站分类]2.Java新手区 (20)
- Java (8)
- [网站分类]4.其他技术区 (10)
- Web (1)
- C++ (2)
- Algorithm (4)
- Linux (2)
- Skill (1)
- Tech (2)
- Note (2)
- [网站分类]3.非技术区 (1)
- Database (1)
- Winty (7)
- [网站分类]1.网站首页原创Java技术区(对首页文章的要求: 原创、高质量、经过认真思考并精心写作。BlogJava管理团队会对首页的文章进行管理。) (0)
最新评论
-
haohao-xuexi02:
很不错哦。
O'Reilly cos上传组件的使用(1/3) - 上传文件 -
yoin528:
useUnicode=true&charact ...
[原]向MySQL数据库插入Blob数据的问题 -
xiaoqing20:
下载来看看!呵呵
[原]Struts2类型转换 -
xiaoqing20:
[原]Struts2类型转换
[标题]: 开发自己的Windows Live Writer插件
[时间]:2009-10-04
[摘要]: 开发一个Windows Live Writer插件,在写博客时,添加自己的代码样式。最终效果是,在Windows Live Writer中选中代码,然后点击插件,将代码包含在<div class="mycode">your code</div>中。
[关键字]: plugin、Windows Live Writer、code、format、highlight、 插件、博客、blog、msi、package、打包、C#
[环境]: Windows Live Writer 14.0.8089.726 zh-cn, Visual Studio 2008 , Windows XP SP3 , Wordpress 2.8.4
[作者]:Winty (wintys@gmail.com) http://www.blogjava.net/wintys
[正文]:
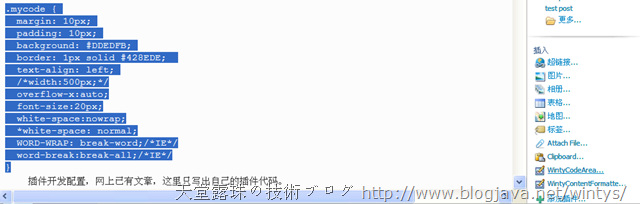
开发一个Windows Live Writer插件,在写博客时,添加自己的代码样式。最终效果是,在Windows Live Writer中选中代码,然后点击插件,将代码包含在<div class="mycode">your code</div>中。当然要在最终发表的博客上添加.mycode 的CSS样式才有效果。
.mycode样式如下:
margin: 10px;
padding: 10px;
background: #DDEDFB;
border: 1px solid #428EDE;
text-align: left;
/*width:500px;*/
overflow-x:auto;
font-size:20px;
white-space:nowrap;
*white-space: normal;
WORD-WRAP: break-word;/*IE*/
word-break:break-all;/*IE*/
}
选中代码,点击"WintyCodeArea":

效果如下图
(在Writer需启用"使用主题编辑",并已从博客中获取主题,才能立即看到效果):

0、准备工作
- 在Visual Studio 2008中新建C#"Class Library"项目
- 在项目中添加References:"C:\Program Files\Windows Live\Writer\WindowsLive.Writer.Api.dll"
- 在项目属性的"Build Events"=>"Post Build Event command line"添加:(XCOPY /D /Y /R "$(TargetPath)" "C:\Program Files\Windows Live\Writer\Plugins")
1、"Class Library"主类,继承于ContentSource
WintyCodeArea.cs:
using System.Windows.Forms;
using WindowsLive.Writer.Api;
/*
2009-10-02
http://www.blogjava.net/wintys
*/
namespace MyWindowsLiveWriterPlugin
{
/*Plugin 主类*/
[WriterPlugin("{7DFB5431-D7DA-4e61-9E4B-056D30DFDB63}",
"WintyCodeArea",
PublisherUrl = "http://www.blogjava.net/wintys"
,
ImagePath = "image.jpg",
HasEditableOptions = true,
Description = "Insert <div class=\"mycode\">your code</div>\nhttp://www.blogjava.net/wintys\nwintys@gmail.com")]
[InsertableContentSource("WintyCodeArea")]
public class WintyCodeArea : ContentSource
{
WintyCodeAreaSettings m_settings;
public override void Initialize(IProperties pluginOptions)
{
base.Initialize(pluginOptions);
m_settings = new WintyCodeAreaSettings(pluginOptions);
}
public override DialogResult CreateContent(IWin32Window dialogOwner, ref string content)
{
string originalContent = content;
content = m_settings.FrontCode;
if(m_settings.EscapeCode)
content += System.Web.HttpUtility.HtmlEncode(originalContent);
else
content += originalContent;
content += m_settings.BackCode;
return DialogResult.OK;
}
public override void EditOptions(IWin32Window dialogOwner)
{
SettingForm settingForm = new SettingForm(m_settings);
settingForm.ShowDialog(dialogOwner);
}
}
}
Initialize()、EditOptions()并不是必须的,这里因为用到了"设置选项"窗口,才需要。
CreateContent(IWin32Window dialogOwner, ref string content)在此为必须,content传入值为Live Writer当前被选中的高亮区的HTML代码 ,无论在编辑还是在源代码视图中都是这样的。content的传出值为你修改后的HTML代码,最终将在Live Writer中显示的。
在CreateContent()中也可以弹出窗体,此处并未用到。以下是代码示例:
public override DialogResult CreateContent(IWin32Window dialogOwner, ref string content)
{
using (InsertCodeForm insertCodeForm = new InsertCodeForm())
{
DialogResult result = insertCodeForm.ShowDialog();
content = insertCodeForm.MyCode;
return result;
}
}
相应的InsertCodeForm类的部分代码如下:
public partial class InsertCodeForm : Form
{
private string m_MyCode;
public string MyCode
{
get { return m_MyCode; }
set { m_MyCode = value; }
}
public InsertCodeForm()
{
InitializeComponent();
}
private void buttonInsert_Click(object sender, EventArgs e)
{
if (textBoxCode.Text == string.Empty)
{
return;
}
m_MyCode = "<div class=\"mycode\">";
m_MyCode += System.Web.HttpUtility.HtmlEncode(textBoxCode.Text);
m_MyCode += "</div>";
this.DialogResult = DialogResult.OK;
}
}
2、用于设置WintyCodeArea插件行为的类
WintyCodeAreaSettings.cs:
using WindowsLive.Writer.Api;
namespace MyWindowsLiveWriterPlugin
{
class WintyCodeAreaSettings
{
IProperties m_properties;
private const string FRONT_CODE = "FRONT_CODE";//前缀代码
private const string BACK_CODE = "BACK_CODE";//后缀代码
private const string ESCAPE_CODE = "ESCAPE_CODE";//是否转义代码
public const string DEFAULT_FRONT_CODE = "<div class=\"mycode\">";
public const string DEFAULT_BACK_CODE = "</div>";
public const bool DEFAULT_ESCAPE_CODE = false;
public WintyCodeAreaSettings(IProperties properties)
{
m_properties = properties;
}
public string FrontCode
{
get
{
return m_properties.GetString(FRONT_CODE, DEFAULT_FRONT_CODE);
}
set
{
m_properties.SetString(FRONT_CODE, value);
}
}
public string BackCode
{
get
{
return m_properties.GetString(BACK_CODE, DEFAULT_BACK_CODE);
}
set
{
m_properties.SetString(BACK_CODE, value);
}
}
public bool EscapeCode
{
get
{
return m_properties.GetBoolean(ESCAPE_CODE, DEFAULT_ESCAPE_CODE);
}
set
{
m_properties.SetBoolean(ESCAPE_CODE, value);
}
}
}
}
3、"设置窗口"的代码
点击"工具=>选项"就可以找到这个设置窗口。

WintyCodeArea的设置窗口:
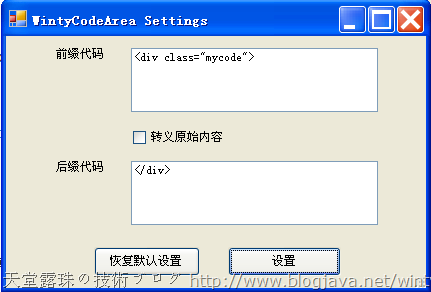
所谓的转义原始内容,就是将所选内容中的特殊HTML字符进行编码(空格与换行不变)。
SettingForm.cs:
using System;
using System.Windows.Forms;
namespace MyWindowsLiveWriterPlugin
{
partial class SettingForm : Form
{
WintyCodeAreaSettings
m_settings;
public SettingForm(WintyCodeAreaSettings settings)
{
InitializeComponent();
//Winty's initialization
m_settings = settings;
txtFrontCode.Text = m_settings.FrontCode;
chkEscapeCode.Checked = m_settings.EscapeCode;
textBackCode.Text = m_settings.BackCode;
}
/*保存设置*/
private void btnOK_Click(object sender, EventArgs e)
{
m_settings.FrontCode = txtFrontCode.Text;
m_settings.EscapeCode = chkEscapeCode.Checked;
m_settings.BackCode = textBackCode.Text;
Close();
}
/*恢复默认设置*/
private void btnRestoreDefault_Click(object sender, EventArgs e)
{
m_settings.FrontCode = WintyCodeAreaSettings.DEFAULT_FRONT_CODE;
m_settings.EscapeCode = WintyCodeAreaSettings.DEFAULT_ESCAPE_CODE;
m_settings.BackCode = WintyCodeAreaSettings.DEFAULT_BACK_CODE;
txtFrontCode.Text = m_settings.FrontCode;
chkEscapeCode.Checked = m_settings.EscapeCode;
textBackCode.Text = m_settings.BackCode;
}
}
}
SettingForm.Designer.cs(这是Visual Studio根据设计的窗体生成的代码):
namespace MyWindowsLiveWriterPlugin
{
partial class SettingForm
{
/// <summary>
/// Required designer variable.
/// </summary>
private System.ComponentModel.IContainer components = null;
/// <summary>
/// Clean up any resources being used.
/// </summary>
/// <param name="disposing">true if managed resources should be disposed; otherwise, false.</param>
protected override void Dispose(bool disposing)
{
if (disposing && (components != null))
{
components.Dispose();
}
base.Dispose(disposing);
}
#region Windows Form Designer generated code
/// <summary>
/// Required method for Designer support - do not modify
/// the contents of this method with the code editor.
/// </summary>
private void InitializeComponent()
{
this.btnOK = new System.Windows.Forms.Button();
this.chkEscapeCode = new System.Windows.Forms.CheckBox();
this.labelFont = new System.Windows.Forms.Label();
this.labelBack = new System.Windows.Forms.Label();
this.txtFrontCode = new System.Windows.Forms.TextBox();
this.textBackCode = new System.Windows.Forms.TextBox();
this.btnRestoreDefault = new System.Windows.Forms.Button();
this.SuspendLayout();
//
// btnOK
//
this.btnOK.Location = new System.Drawing.Point(222, 211);
this.btnOK.Name = "btnOK";
this.btnOK.Size = new System.Drawing.Size(113, 29);
this.btnOK.TabIndex = 0;
this.btnOK.Text = "设置";
this.btnOK.UseVisualStyleBackColor = true;
this.btnOK.Click += new System.EventHandler(this.btnOK_Click);
//
// chkEscapeCode
//
this.chkEscapeCode.AutoSize = true;
this.chkEscapeCode.Location = new System.Drawing.Point(127, 94);
this.chkEscapeCode.Name = "chkEscapeCode";
this.chkEscapeCode.Size = new System.Drawing.Size(96, 16);
this.chkEscapeCode.TabIndex = 1;
this.chkEscapeCode.Text = "转义原始内容";
this.chkEscapeCode.UseVisualStyleBackColor = true;
//
// labelFont
//
this.labelFont.AutoSize = true;
this.labelFont.Location = new System.Drawing.Point(48, 12);
this.labelFont.Name = "labelFont";
this.labelFont.Size = new System.Drawing.Size(53, 12);
this.labelFont.TabIndex = 2;
this.labelFont.Text = "前缀代码";
//
// labelBack
//
this.labelBack.AutoSize = true;
this.labelBack.Location = new System.Drawing.Point(48, 125);
this.labelBack.Name = "labelBack";
this.labelBack.Size = new System.Drawing.Size(53, 12);
this.labelBack.TabIndex = 4;
this.labelBack.Text = "后缀代码";
//
// txtFrontCode
//
this.txtFrontCode.Location = new System.Drawing.Point(125, 12);
this.txtFrontCode.Multiline = true;
this.txtFrontCode.Name = "txtFrontCode";
this.txtFrontCode.Size = new System.Drawing.Size(247, 64);
this.txtFrontCode.TabIndex = 5;
//
// textBackCode
//
this.textBackCode.Location = new System.Drawing.Point(125, 125);
this.textBackCode.Multiline = true;
this.textBackCode.Name = "textBackCode";
this.textBackCode.Size = new System.Drawing.Size(247, 64);
this.textBackCode.TabIndex = 6;
//
// btnRestoreDefault
//
this.btnRestoreDefault.Location = new System.Drawing.Point(88, 211);
this.btnRestoreDefault.Name = "btnRestoreDefault";
this.btnRestoreDefault.Size = new System.Drawing.Size(106, 29);
this.btnRestoreDefault.TabIndex = 7;
this.btnRestoreDefault.Text = "恢复默认设置";
this.btnRestoreDefault.UseVisualStyleBackColor = true;
this.btnRestoreDefault.Click += new System.EventHandler(this.btnRestoreDefault_Click);
//
// SettingForm
//
this.AutoScaleDimensions = new System.Drawing.SizeF(6F, 12F);
this.AutoScaleMode = System.Windows.Forms.AutoScaleMode.Font;
this.ClientSize = new System.Drawing.Size(420, 252);
this.Controls.Add(this.btnRestoreDefault);
this.Controls.Add(this.textBackCode);
this.Controls.Add(this.txtFrontCode);
this.Controls.Add(this.labelBack);
this.Controls.Add(this.labelFont);
this.Controls.Add(this.chkEscapeCode);
this.Controls.Add(this.btnOK);
this.Name = "SettingForm";
this.Text = "WintyCodeArea Settings";
this.ResumeLayout(false);
this.PerformLayout();
}
#endregion
private System.Windows.Forms.Button btnOK;
private System.Windows.Forms.CheckBox chkEscapeCode;
private System.Windows.Forms.Label labelFont;
private System.Windows.Forms.Label labelBack;
private System.Windows.Forms.TextBox txtFrontCode;
private System.Windows.Forms.TextBox textBackCode;
private System.Windows.Forms.Button btnRestoreDefault;
}
}
4、总结
工程最终生成WintyCodeArea.dll,将其复制到"C:\Program Files\Windows Live\Writer\Plugins"目录,启动Windows Live Writer就可以使用这个插件了。或将其做成WintyCodeAreaWLWPluginSetup.msi(见附件),点安装即可(msi制作方法参考[11])。
此插件主要供自己使用,其他人可能不会想要我的这种效果,所以暂命名WintyCodeArea。但是除了添加<div class="mycode">your code</div>外,还可以进行代码转义设置,并且前后缀代码都可以自定义,根据需要自己添加前缀后缀代码就行了,所以,希望对别人有点用处。
补充:
如果插件需要访问剪贴板,可参考如下代码:
//System.Windows.Forms.Clipboard
IDataObject iData = Clipboard.GetDataObject();
if (iData.GetDataPresent(DataFormats.Text))
{
str = (String)iData.GetData(DataFormats.Text);
......
}
[参考资料]:
[1]*《Developing Plugins for Windows Live Writer 》 : http://www.devx.com/codemag/Article/38214/1954
[2]*《为Windows Live Writer开发插件——InsertSearchPageLink 》 : http://www.cnblogs.com/dflying/archive/2006/12/03/580602.html
[3]*《Writing a simple Windows Live Writer plugin 》 : http://blog.boyet.com/blog/blog/writing-a-simple-windows-live-writer-plugin/
[4] 《The New Live Writer SDK 》: http://www.liveside.net/developer/archive/2008/06/03/the-new-live-writer-sdk.aspx
[5] 《Writing Plugins For Windows Live Writer - Working With Forms 》 : http://www.liveside.net/developer/archive/2006/10/19/Writing-Plugins-For-Windows-Live-Writer-_2D00_-Working-With-Forms.aspx
[6] 《Writing Plugins For Windows Live Writer - Using PluginHttpRequest Instead of HttpWebRequest 》 : http://www.liveside.net/developer/archive/2007/10/20/writing-plugins-for-windows-live-writer-using-pluginhttprequest-instead-of-httpwebrequest.aspx
[7] 《Windows Live Writer Plugin - Properties Panel 》 : http://blog.benhall.me.uk/2007/09/windows-live-writer-plugin-properties.html
[8] 《Windows Live Writer Plugin - Display a form / OpenFileDialog 》 : http://blog.benhall.me.uk/2007/09/windows-live-writer-plugin-display-form.html
[9] LiveSide Source Code : http://cid-fabdddc5cad93494.skydrive.live.com/self.aspx/LiveSide%20-%20Public/SourceCode/MyNewPlugin%20-%20Adding%20An%20Icon.zip?wa=wsignin1.0&sa=732043521
[10] 《Windows Live Writer Plugin - Hello World! 》 : http://blog.benhall.me.uk/2007/09/windows-live-writer-plugin-hello-world.html
[11]*《Windows Live Writer Plugin - Installation 》 : http://blog.benhall.me.uk/2007/10/windows-live-writer-plugin-installation.html
[12] MSDN Windows Live Writer SDK : http://msdn.microsoft.com/en-us/library/aa738906.aspx
[13] Windows Live Writer Blog : http://www.live-writer.net/
[14] Windows Live Gallery : http://gallery.live.com/results.aspx?bt=9&pl=8
[附件]:
[1] WintyCodeAreaProject.zip(Visual Studio工程) : WintyCodeAreaProject.zip
[2] WintyCodeAreaWLWPluginSetup.zip(WintyCodeArea插件安装程序,msi格式) : http://www.blogjava.net/Files/wintys/WintyCodeAreaWLWPluginSetup.zip
作者:Winty (wintys@gmail.com)
博客:http://www.blogjava.net/wintys

- 大小: 64.3 KB


- 大小: 72 KB


- 大小: 114.8 KB


- 大小: 44 KB

- WintyCodeAreaProject.zip (8.7 KB)
- 下载次数: 6
- WintyCodeAreaWLWPluginSetup.zip (147.5 KB)
- 下载次数: 5


发表评论

-
[原]简易Windows密码查看器
2009-10-10 00:08 1719[标题]:简易Windows密码查看器 [时间]:2009- ... -
[原]手机姓名秀 - NameShow
2010-01-30 21:48 1022手机姓名秀 - NameShow 在手机上展示你的姓 ... -
[原]ORACLE实验2007
2010-03-10 13:46 1082ORACLE实验2007 实验一 练习1、请查询表DEPT中所 ... -
我的Stylish CSS
2010-03-23 14:10 1163■去除126邮箱广告的Stylish CSS: @-moz- ... -
Greasemonkey猴子脚本
2010-03-23 14:18 982// ==UserScript== // @name ... -
[原]将Puppy Linux安装到U盘
2009-09-21 00:12 5654[标题]:将Puppy Linux安装到U盘 [时间]:2 ... -
[原]在全局鼠标钩子中模拟鼠标右键单击
2009-03-28 15:55 4219[标题]:在全局鼠标钩子中模拟鼠标右键单击 [时间]:2009 ... -
[原]使用"异或"简单加密的实现
2009-04-19 19:30 2038[标题]:使用"异或"简单加密的实现 [时 ... -
[转]在Word中让目录不显示页码
2009-05-07 23:26 1758[问题]: 文章由目录和正文两部分组成,我想让目录部分不显示页 ...
相关推荐
windows live writer 插件,代码插件,文字竖排插件,表情插件
windows live writer 插件 windows live writer 插入代码插件
Windows Live Writer的代码高亮插件及其它一些插件的集合
代码插件代码插件代码插件代码插件代码插件代码插件代码插件代码插件代码插件代码插件代码插件代码插件代码插件代码插件代码插件代码插件代码插件代码插件代码插件代码插件代码插件代码插件代码插件代码插件代码插件
windows live writer代码插件,从visual studio中复制代码,在windows live writer中直接粘贴。
windows live writer 2016,微软开源的最新writer软件
一个Windows Live Writer插件,在写博客时,添加自己的代码样式。最终效果是,在Windows Live Writer中选中代码,然后点击插件,将代码包含在<div class="mycode">your code中。 更多内容请参见...
Windows Live Writer相关的工具,用于写博客
Open Live Writer 是Windows Live Writer的开源版本。由微软官方于2015年1月份在Github上面开源。 截止至2016-09-27最新版本。
windows live writer 2008 只能在xp下使用,这个版本可以在2003下使用ff
5个: cf.SyntaxHighighter.msi ...Insert Code for Windows Live Writer.msi SourceCodePlugin_version_1.1.zip SourceCodePluginSetup.msi 效果见: http://blog.csdn.net/dadoneo/archive/2011/04/02/6299133.aspx
Windows_Live_Writer Windows_Live_Writer Windows_Live_Writer 离线写博客工具
Windows Live Writer 12.0.1370.325 绿色版 所有系统都支持包括windows server 2003 目前的最新版本
自己写的一个Windows Live Writer 插件,用于在CSDN上插入代码
Code Formatter Plugin for Windows Live Writer 代码高亮工具下载
Windows Live Writer 12.0.1366.1026
CodePaste for Windows Live Writer 插件可以把 Visual Studio 等编辑器复制的源代码转换为 HTML 插入到你的博客中,且不丢失高亮颜色信息!有多个选项控制生成的样式。使用方法请见:...
Windows Live Writer插件,插入代码块,可选择的效果有代码是否着色、是否加行号、是否隔行变色
Windows Live Writer 完整安装包